
Turning a podcast into Shorts is not a matter of cutting every lively sentence into a vertical video. The useful workflow is to find a moment with a complete idea, preserve the question or setup it needs, correct the captions and framing, then decide whether the result is ready to publish.
This guide gives you a tool-neutral process for video and audio podcasts. It includes three working tools you can copy: a complete-thought test, a candidate and correction log, and a publish, repair or reject framework.
Evidence and limitations: This is evidence-independent workflow guidance. It contains no product tests, ratings, rankings, performance claims or recommendations. Platform details were checked against official YouTube, Instagram and TikTok documentation on 16 September 2026. Platform rules and interfaces can change, so recheck them before publication.
The podcast-to-Shorts workflow in seven steps
Use the same sequence whether you select moments manually or use software to propose candidates:
- Define the clip's job. Decide what the viewer should understand, feel or do after watching.
- Prepare the episode and transcript. Gather the best available source recording, transcript and speaker names.
- Build a candidate log. Record possible moments before polishing any one clip.
- Run the complete-thought test. Check whether each candidate makes sense outside the episode.
- Repair the boundaries. Add necessary setup, remove irrelevant lead-in and end after the idea lands.
- Correct captions and framing. Check words, speaker identity, vertical composition and visual meaning.
- Publish, repair or reject. Make an explicit editorial decision instead of treating every candidate as an output.
The process is deliberately selective. An episode does not owe you a fixed number of clips. If only one moment passes the checks, publish one. A quota is not a reason to weaken the standard.
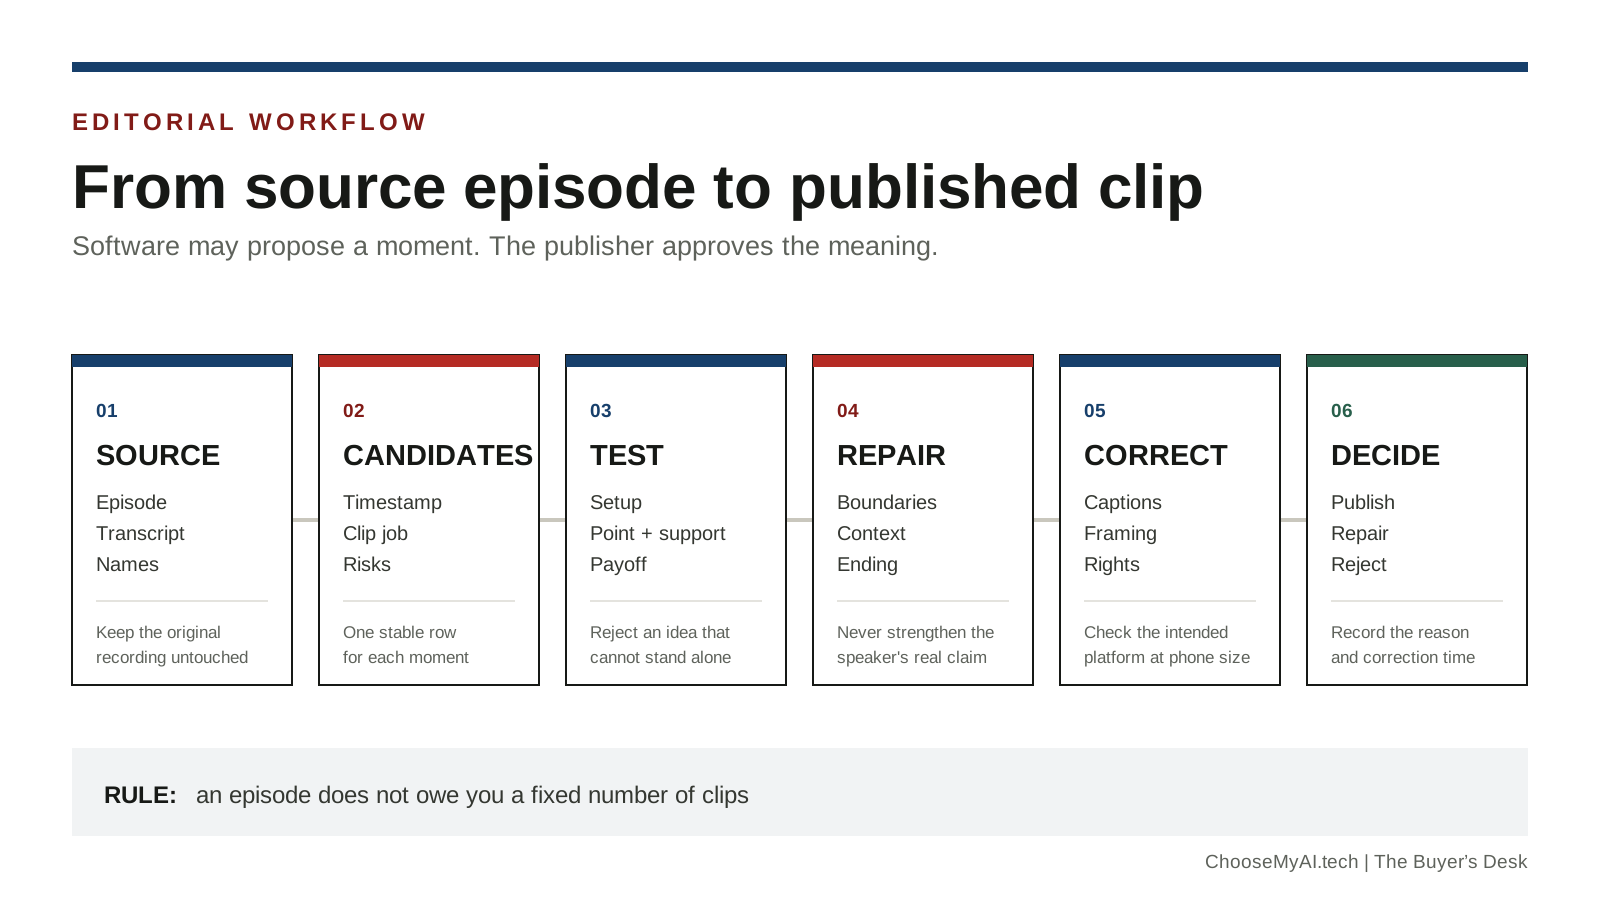
Decide what job the clip must do
Start with one sentence:
This clip should help the viewer ____.
Examples of jobs include:
- Understand one practical idea
- Hear a guest answer a clear question
- Recognise a common mistake
- See a useful disagreement
- Become curious about the full discussion without being misled
Avoid goals such as "go viral" or "make ten clips". They do not tell you what meaning the candidate must preserve.
Write the job in your candidate log before editing. It gives you a standard for deciding what stays and what goes.
Prepare the episode and transcript
Use the highest-quality source you are authorised to edit. Keep the original recording untouched and work from a copy.
Before searching for moments, collect:
- The video or audio master
- A transcript, even if it needs correction
- Correct speaker names and job titles
- A short list of specialist terms, names and acronyms
- Any recording, guest or content permissions relevant to publication
- Episode notes that identify important questions or topic changes
For a video podcast, note whether each speaker has a separate camera or audio track. For an audio-only podcast, decide whether the final format will use a waveform, a static visual, licensed supporting material or another treatment. This guide does not assume that one visual format suits every source.
A transcript helps you search, but it is not the final authority. Listen to the audio and inspect the video around each candidate. Tone, pauses, speaker changes and visual references can alter the meaning of the words.
Build a candidate and correction log
The log stops promising moments from becoming an untraceable folder of exports. Create one row for every candidate before doing detailed caption or framing work.
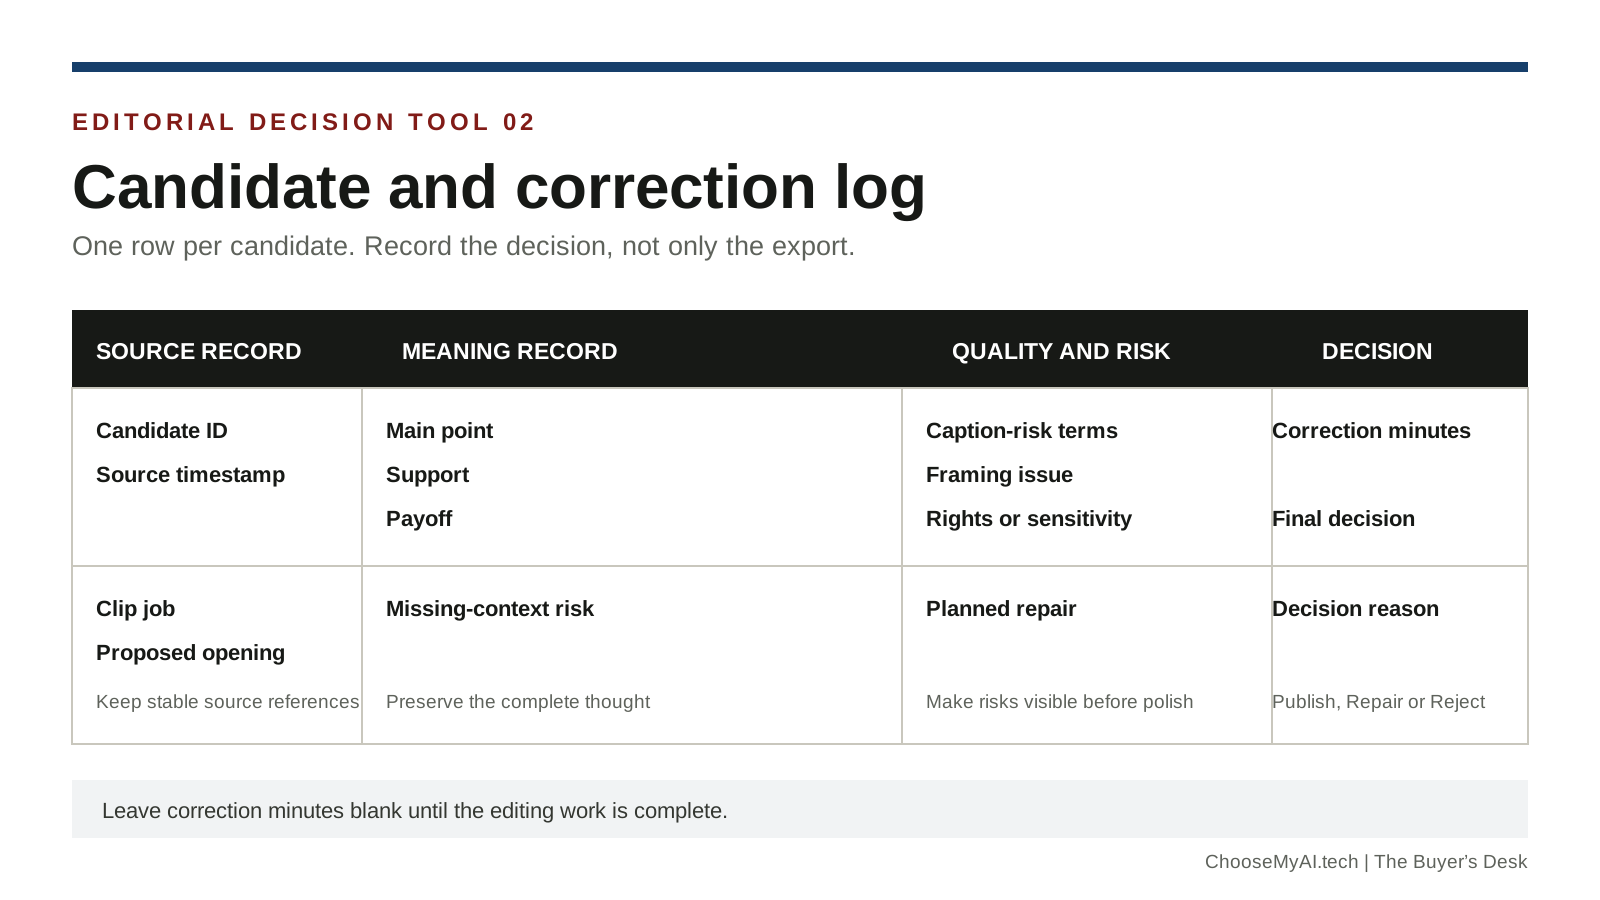
Copyable candidate and correction log
| Field | What to record |
|---|---|
| Candidate ID | A stable label such as P01-C01 |
| Source timestamp | Start and end in the full episode |
| Clip job | The one thing the viewer should receive |
| Proposed opening | The first spoken line or necessary question |
| Main point | The claim, answer or lesson |
| Support | The reason, example or explanation that makes the point credible |
| Payoff | The conclusion or useful ending |
| Missing-context risk | What a viewer would not know outside the episode |
| Caption-risk terms | Names, jargon, numbers, acronyms or words likely to be wrong |
| Framing issue | Speaker changes, split screen, gestures or visual references |
| Rights or sensitivity check | Guest permission, private information or unsuitable material |
| Planned repair | Extend boundary, add source-faithful context, correct text or reframe |
| Correction minutes | Fill in after editing, not as an estimate presented as fact |
| Final decision | Publish, Repair or Reject |
| Decision reason | One sentence explaining the decision |
Blank row to copy
| Candidate ID | Source timestamp | Clip job | Proposed opening | Main point | Support | Payoff | Missing-context risk | Caption-risk terms | Framing issue | Rights or sensitivity check | Planned repair | Correction minutes | Final decision | Decision reason |
|---|---|---|---|---|---|---|---|---|---|---|---|---|---|---|
How a beginner should use the log
- Watch or read through the episode once for meaning, not for polish.
- Add a row whenever a moment appears capable of doing one clear job.
- Record wider source boundaries than you expect to publish. Cutting can come later.
- Fill in the missing-context and caption-risk fields before editing.
- Run the complete-thought test.
- Edit only the candidates marked Repair or likely Publish.
- Record the final correction time after the work is complete.
- Keep rejected rows. They show which kinds of candidates waste time or repeatedly lose context.
Do not fill the log with invented precision. If you did not measure correction time, leave that cell blank.
Run the complete-thought test
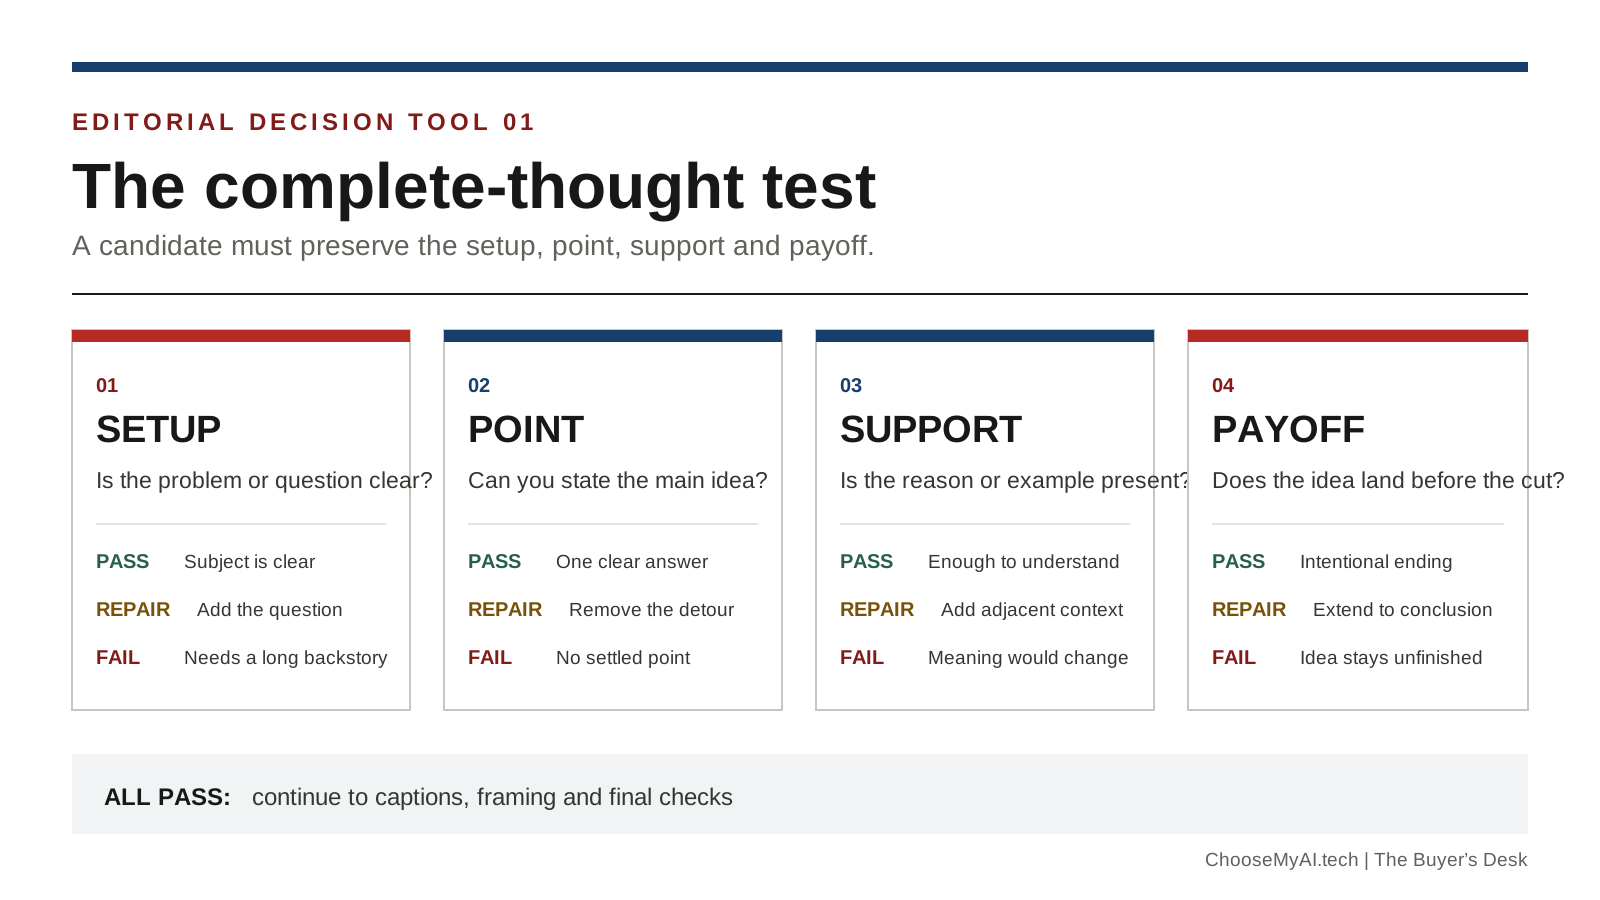
A candidate passes only when a new viewer can follow the idea without relying on the full episode. Check four parts in order.
1. Setup
Question: Does the viewer know what problem, question or situation the speaker is addressing?
- Pass: The subject is clear from the opening.
- Repair: The necessary question or short setup exists just before the current start point.
- Fail: Understanding depends on a long earlier discussion that cannot be added cleanly.
2. Point
Question: Can you state the speaker's main answer or claim in one sentence?
- Pass: The candidate contains one identifiable point.
- Repair: Remove a detour or extend the ending until the point becomes clear.
- Fail: The candidate contains several unfinished ideas or no settled point.
3. Support
Question: Does the candidate include the reason, example or explanation needed to understand the point?
- Pass: The point has enough support for the clip's job.
- Repair: Include the adjacent sentence that supplies the missing reason or example.
- Fail: Removing the wider discussion would make the point sound unsupported or different from what the speaker meant.
4. Payoff
Question: Does the clip end after the idea lands?
- Pass: The ending feels complete and source-faithful.
- Repair: Extend the boundary to include the conclusion, caution or answer.
- Fail: The speaker never completes the idea in a form that can stand alone.
Complete-thought decision card
| Result | Decision |
|---|---|
| All four parts pass | Continue to captions, framing and final checks |
| One or more parts need repair | Return to the source and change the boundaries before polishing |
| Any part fails without a source-faithful repair | Reject the candidate |
A text overlay cannot rescue a clip by inventing context the speaker did not provide. Added text may clarify the real topic or identify a speaker, but it must not create a stronger promise, certainty or conclusion than the source supports.
Cut the setup, answer and payoff without changing the meaning
Once a candidate has a clear job, edit its boundaries in this order:
- Start wide enough to include the necessary setup.
- Remove greetings, repetition or unrelated lead-in only when the transition remains honest.
- Keep the sentence that states the main point.
- Keep enough support for the viewer to understand it.
- End after the payoff, caution or conclusion.
- Replay the clip without looking at the episode notes.
If the candidate begins with an answer such as "Yes, but that only works in one case", the missing question may be essential. Include the question when possible. If the question is too long, use a short on-screen topic label only when it accurately describes the recorded exchange.
Do not manufacture a hook by moving words, removing qualifications or turning a cautious statement into a confident claim.
Correct captions and framing
Caption correction is editorial work, not decoration. Review every line against the source audio, with extra attention to:
- Guest and company names
- Numbers, prices and dates
- Technical terms
- Acronyms
- Negatives such as "not" and "never"
- Speaker changes
- Words hidden by crosstalk or laughter
TikTok's official support documentation says uploaded videos can receive auto-generated captions and that creators can edit or remove them. It also says creator captions can be previewed and edited line by line before saving.[3] That control does not remove the publisher's responsibility to check the words against the source.
For video podcasts, watch the vertical version from start to finish. Check that:
- The active speaker remains visible
- Speaker changes do not trigger a late or incorrect crop
- Gestures and referenced objects remain understandable
- Captions do not cover faces, names or essential on-screen material
- A two-person layout remains readable at phone size
For audio-only podcasts, label the visual treatment honestly. Do not imply that a generated image, stock shot or unrelated video came from the recorded conversation.
Use the publish, repair or reject framework
Every candidate should finish with one of three explicit decisions.
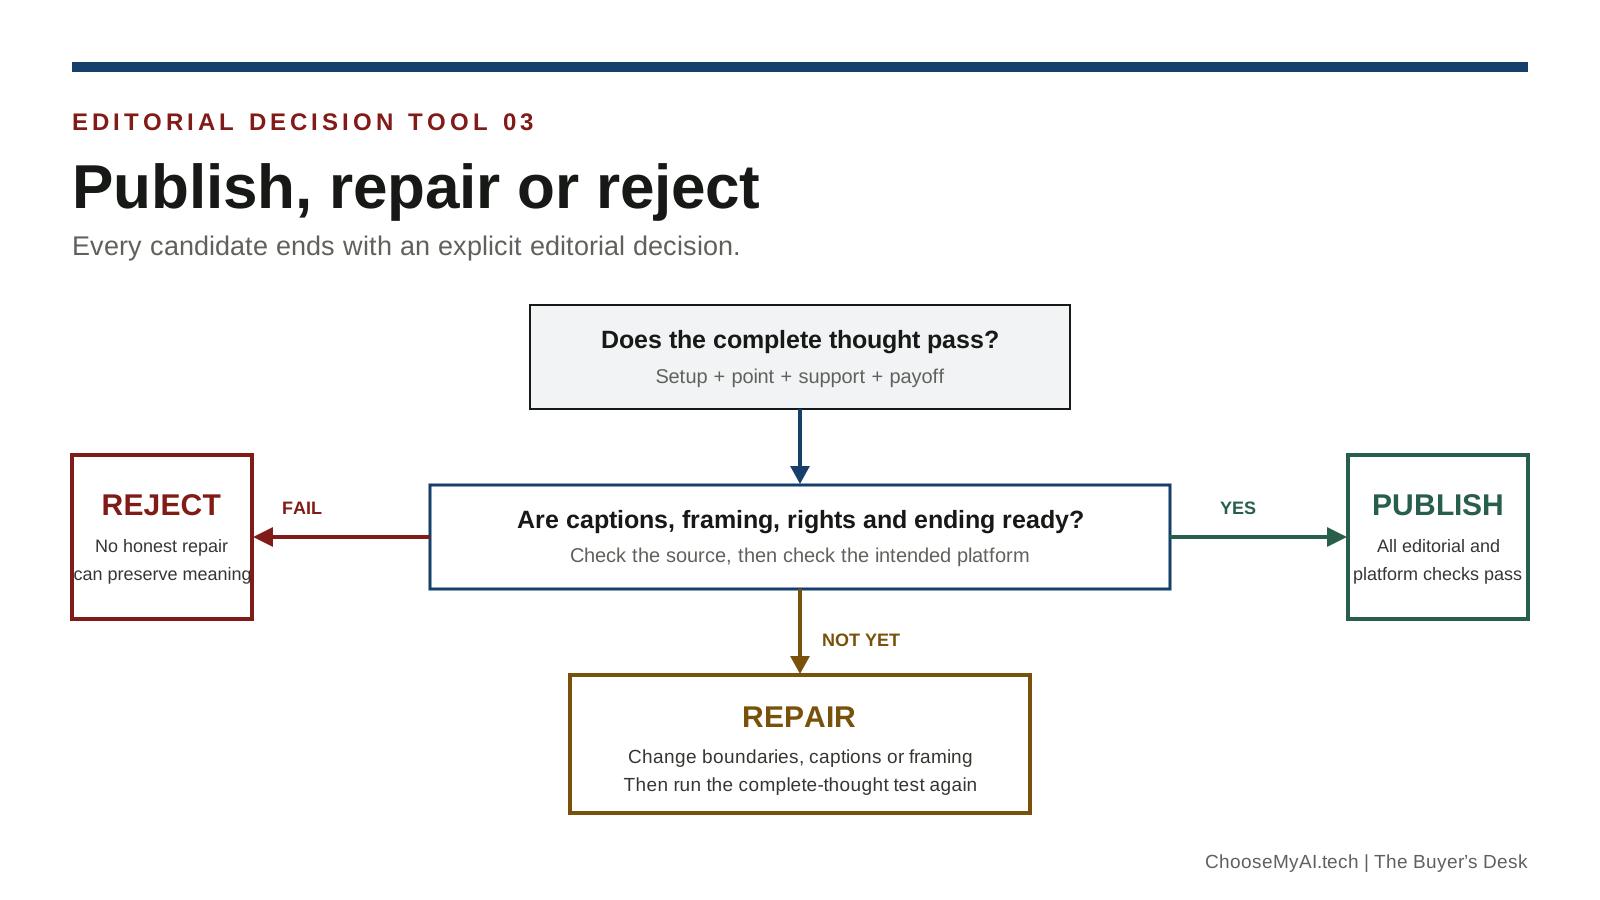
Publish
Choose Publish only when:
- All four complete-thought checks pass
- The opening is clear without a misleading hook
- Captions match the source
- Framing preserves the active speaker and relevant visual information
- Rights and sensitivity checks are resolved
- The clip has an intentional ending
- The export has been checked on the intended platform
Record one sentence explaining why the clip is ready.
Repair
Choose Repair when the problem can be fixed without changing the speaker's meaning. Appropriate repairs include:
- Start earlier to include the question
- End later to include the answer or caution
- Remove an unrelated detour
- Correct names, numbers or technical terms
- Replace an incorrect automatic crop
- Add a source-faithful topic label
- Change the visual treatment for an audio-only source
After repairing, run the complete-thought test again. A repaired candidate is not automatically approved.
Reject
Choose Reject when:
- The moment depends on too much missing context
- A short edit would distort or overstate the speaker's meaning
- The question and answer cannot be joined cleanly
- Important words cannot be verified from the source
- The available framing hides essential visual information
- Permission or sensitivity concerns remain unresolved
- The candidate exists only to meet a clip quota
Rejection is useful evidence about the workflow. Keep the row and reason in the log. It may reveal recurring recording, transcription or framing problems that should be addressed before the next episode.
Export and publish without treating every platform as identical
Make a final platform check after the editorial decision, not before it.
YouTube Shorts
YouTube's official built-in workflow lets a creator edit a Short from a public long-form video they have already uploaded. In that workflow, the creator can select up to 60 seconds. YouTube also says private videos, unlisted videos and videos with third-party copyright claims cannot use this feature.[1]
This is one native workflow, not a universal limit for every editing or upload route. Check YouTube's current documentation for the route you intend to use.
Instagram Reels
Instagram's official Help Centre currently accepts Reel aspect ratios from 1.91:1 to 9:16 and states a minimum frame rate of 30 FPS and minimum resolution of 720 pixels.[2] These are acceptance requirements, not a guarantee that every permitted layout will be equally readable.
Check the exported file at phone size. A permitted horizontal or near-square frame may still be a poor choice for a clip designed around two speakers and captions.
TikTok
TikTok provides auto-generated and creator-caption controls, including caption editing.[3] Check the current posting interface and accessibility guidance before publishing because platform controls can change.
Final platform checklist
- The file opens and plays correctly
- The intended aspect ratio was exported
- Captions remain inside the visible area
- The cover or opening frame identifies the subject accurately
- The description does not overstate the clip
- Any link or call to action matches the clip's job
- The published version is checked after upload
Measure correction work and learn from rejected candidates
After each editing session, complete the correction-minutes and final-decision fields in the log. Use actual recorded time only. Do not estimate it later and present the estimate as measured fact.
Review the log for patterns:
- Which source sections produce complete ideas?
- Which names or terms repeatedly fail in captions?
- Which camera layout creates the most framing repairs?
- Which candidates are rejected because the question is missing?
- Which type of clip requires more correction than it is worth?
These observations describe your own workflow. They do not prove that one product performs better than another. A product comparison requires controlled testing under equivalent conditions.
Common podcast-clipping failures
Starting after the question
The answer may sound strong but remain impossible to understand. Return to the source and include the minimum necessary question or setup.
Treating intensity as completeness
A loud, emotional or surprising line is not automatically a usable clip. It still needs a point, support and payoff.
Trusting the transcript without listening
A transcript can hide crosstalk, irony, hesitation and speaker changes. Verify the candidate against the source audio and video.
Correcting captions but not meaning
Perfect spelling cannot repair a clip that misrepresents the discussion. Run the complete-thought test before detailed caption styling.
Publishing every generated candidate
Automated suggestions are candidates, not approvals. Apply the same publish, repair or reject decision to every source, regardless of how it was found.
Forcing the same export everywhere
A file can meet a platform's technical requirements and still be hard to read. Check framing, captions and opening context on the intended destination.
Podcast-to-Shorts checklist
Before selection
- Define the clip's job
- Keep the original recording untouched
- Gather the transcript and correct speaker names
- Record relevant permissions and sensitivity concerns
- Create the candidate log
For each candidate
- Record the source timestamp
- Run setup, point, support and payoff checks
- Record missing-context risk
- Record caption-risk terms
- Check framing or visual treatment
- Choose Publish, Repair or Reject
- Record the reason
Before publication
- Verify every caption against the source
- Check the vertical version at phone size
- Confirm the opening is accurate
- Confirm the ending is intentional
- Resolve rights and sensitivity checks
- Recheck current platform requirements
- Inspect the uploaded version
- Record actual correction time
Next step
Copy the candidate and correction log for your next episode. Evaluate one candidate with the complete-thought test before choosing any clipping software. For the principles behind ChooseMyAI's evidence standards, read How we test AI video repurposing tools. For a neutral overview of software categories, see AI video repurposing tools explained. If your source is presentation-led, use the webinar-to-shorts workflow.
Sources and freshness record
Platform-specific facts were verified against the following official primary sources on 16 September 2026. Platform rules and interfaces can change, so recheck them before publication.
- YouTube Help: Create YouTube Shorts from your videos Verified 16 September 2026
- Instagram Help Centre: Reel size and aspect ratios Verified 16 September 2026
- TikTok Support: Accessibility and captions Verified 16 September 2026